How to handle authentication with GraphQL
Tue Apr 02 2019
I have always wanted to try out GraphQL and there are tonnes of resources on the internet on how to get started but I couldn't find one that explained best on how to handle authentication and authorization, some included other modules and packages that I didn't see to be a necessity in my set up, so I thought of sharing my set up.
Let's Start by Defining GraphQL
While I won't be going deep to explain GraphQL or comparing GraphQL with REST, I would want you to have a basic understanding of what it is and how it does what it does.
GraphQL is a query language for APIs and a runtime for fulfilling those queries with your existing data. GraphQL provides a complete and understandable description of the data in your API, gives clients the power to ask for exactly what they need and nothing more, makes it easier to evolve APIs over time, and enables powerful developer tools. GraphQL Official Website.
GraphQL has gained a lot of traction and it is used by big companies like Facebook, Github, Pinterest, Shopify, and others.
With GraphQL you describe the data of your app, you tell it exactly what data you want and you get a response of only the data you requested, this helps you avoid getting more data that you want, a simple example looks like the following:
type Course {
  _id: String
  name: String
  units: [Unit]
  topics: [Topic]
  createdAt: String
  createdBy: String
  createdByName: String
}
a course schema

here we specify to GraphQL what data we want to get.
I expanded the above screenshot on purpose to show you that the GraphQL playground documents the schema on your behalf and you can extend this, it also has a great autocompletion to help you as you type.
Let's talk about the basic foundations of GraphQL
Query
a query in GraphQL is how you request and fetch data, consider it like you are sending a request that says, Hey give me data in this format, queries are the foundation of GraphQL and that is why is it called a query language nothing else.
Mutation
Mutations are also queries but they go further by manipulating the data passing through them. Mutations are functions that modify data in the data store and return a value, we will look at some examples later.
Schema
A schema is representational of the data, this describes the entirety of all the fields of a specific entity that might be requested from any client. One thing to note is that the client doesn't have to request all fields specified in the schema when querying you only specify which data you need and GraphQL will figure out the rest.
If you want to learn more on the subject check this link, there is an amazing tutorial that covers GraphQL from the client to server.
Enough talk, let's get authenticating 😀
We will be using Apollo Server for a quick set up and lots of good tools that Apollo provides out of the box. Things to keep in mind when authentication apps, we will assume a password based login system.
- User Registration(email or password)
- Input Validation
- Authorization
- Password Hashing
- Generating and validating a token
Note: GraphQL doesn't do any of the above on your behalf, keep in mind that it is just a query language, so we need to tell what queries are protected and how to protect those queries. Tools we are going to use:
jsonwebtoken(to generate a timed token for every user)
bcrypt(for password hashing)
Let's start by defining user schema
const userDefs = gql`
type Query {
  user: User
}
type Mutation {
  register( email: String!, password: String!): User!
  login(email: String!, password: String!): String!
}
type User {
  _id: String
  email: String
  password: String
}
`
In the above snippet, we wrote our type definitions for the user, we have 3 main things, Query is the main or the root query, everything else is returned under this query. this defines what data should be returned when we query for a user. Mutations, as we explained above, are for any side effect that goes on with GraphQL, this is very important because we now know what kind of data our user will contain.
Let's write resolvers so that our mutations can work as expected
resolvers are basically functions that act on our data and do something then they return a value, resolvers should match the schema otherwise GraphQL will throw you an error.
Now it is time to use the packages we mentioned above, let start by registering the user and hashing the password, it is very a very good practice to not store password as plain text, we will bcrypt to hash the password and later on compare the hashed value and the given password before we log the user in.
Let's modify our resolvers to hash the password and generate a token.
  Mutation: {
    async register(root, { email, password }) {
      // { email, password } this is coming from the args(arguments) that are passed down when registering
      let user = new User()
      user.email = email
      // here we hash the password using bcrypt and store the hashed value in the db
      user.password = await bcrypt.hash(password, 12)
      // save the user to the db
      // it shouldn't matter what db you are using
      return user.save()
    },
    async login(root, { email, password }, { SECRET }) {
      // The secret is coming from the context that will pass to Apollo Server
      // the next lines basically check if the user exist or not
      const user = await User.findOne({ email })
      if (!user) {
        throw new Error('No user found ')
      }
      // user.password contains the hashed password
      // we use bcrypt again to compare with the password from the args
      const isValid = await bcrypt.compare(password, user.password)
      if (!isValid) {
        throw new Error('Incorrect password ')
      }
      //   sign in the user
      // create the token specifically for the user and return the token
      // you can specify how long the token will take to expire, this is up to you
      const token = await jwt.sign(
        {
          user: pick(user, ['_id', 'email']),
        },
        SECRET,
        // this token will last for a year, this should be adjusted accordingly
        { expiresIn: '1y' }
      )
      // so basically we don't do much here, we only return the token when the user successfully logs in
      return token
    },
  },
So this is basically what you need to get the basic authentication going on, but the context you saw above and token have to be used somewhere, that is what we are going to do. We need to let Apollo Server know that we are passing the token and the secret in the context, the code below is too long so let me first break it down to summarise it all.
TLDR;
- Create a user model
- Connect to the database
- Register the user via the register mutation with a hashed password
- Login the user and generate a token in the login mutation
- Pass the context and the user to the context(to access them in resolvers later)
- Protect all other queries and mutations to depend on the validity of the token.
const { ApolloServer, gql } = require('apollo-server');
const jwt = require('jsonwebtoken');
const mongoose = require('mongoose');
const bcrypt = require('bcrypt');
const pick = require('lodash').pick;

// configure the user collection
const userSchema = mongoose.Schema({
  email: String,
  password: String,
});
const User = mongoose.model('User', userSchema);

// connect to mongodb here
mongoose.Promise = global.Promise;
mongoose.connect(
  `mongodb://${process.env.USER}:${process.env.PASS}@ds261716.mlab.com:61716/user-test`,
  { useNewUrlParser: true }
);

// Construct a schema, using GraphQL schema language
const typeDefs = gql`
  type Query {
    user: User
  }
  type Mutation {
    register(email: String, password: String): User!
    login(email: String, password: String): String!
  }
  type User {
    email: String
    password: String
  }
`;

// keep this secret in a safe env and make it as strong as possible
const SECRET = 'createaverystrongsec34!retthatalsoincludes2423412wdsa324e34e';
// Provide resolver functions for your schema fields
const resolvers = {
  Query: {
    user(root, args, { user }) {
      return user;
    },
    users(root, args, { user }) {
      // check if is logged before giving them other user's info
      if (!user) {
        throw new Error('You are not logged in to access this information ');
      }
      return User.find({});
    },
  },
  Mutation: {
    register: async (root, args) => {
      const user = User();
      // we will get the email and password from the args object
      user.email = args.email;
      user.password = await bcrypt.hash(args.password, 12);
      // save the user to the db
      return user.save();
    },
    login: async (root, args, context) => {
      // check if the user exists
      const user = await User.findOne({ email: args.email });
      if (!user) {
        throw new Error('No user found ');
      }
      // check if the password matches the hashed one we already have
      const isValid = await bcrypt.compare(args.password, user.password);
      if (!isValid) {
        throw new Error('Incorrect password ');
      }
      //   sign in the user
      // if the user exist then create a token for them
      const token = await jwt.sign(
        {
          user: pick(user, ['_id', 'email']),
        },
        SECRET,
        // this token will last for a day, but you can change it
        // check the jsonwebtoken for more on this
        { expiresIn: '1d' }
      );
      return token;
    },
  },
};
const server = new ApolloServer({
  typeDefs,
  resolvers,
  // you can catch all the request in the context
  context: async ({ req }) => {
    const token = await req.headers['authentication'];
    let user;
    try {
      user = await jwt.verify(token, SECRET);
      console.log(`${user.user} user`);
    } catch (error) {
      console.log(`${error.message} caught`);
    }
    // the user and secret we are passing here is what we access in every resolver
    return {
      user,
      SECRET,
    };
  },
});
server.listen().then(({ url }) => {
  console.log(`🚀 Server ready at ${url}`);
});
The code isn't as clean and all the code in contained in in one file 🤨 to help visualize this, it is only for demonstration sake and to show you how you can do basic authentication and authorization.
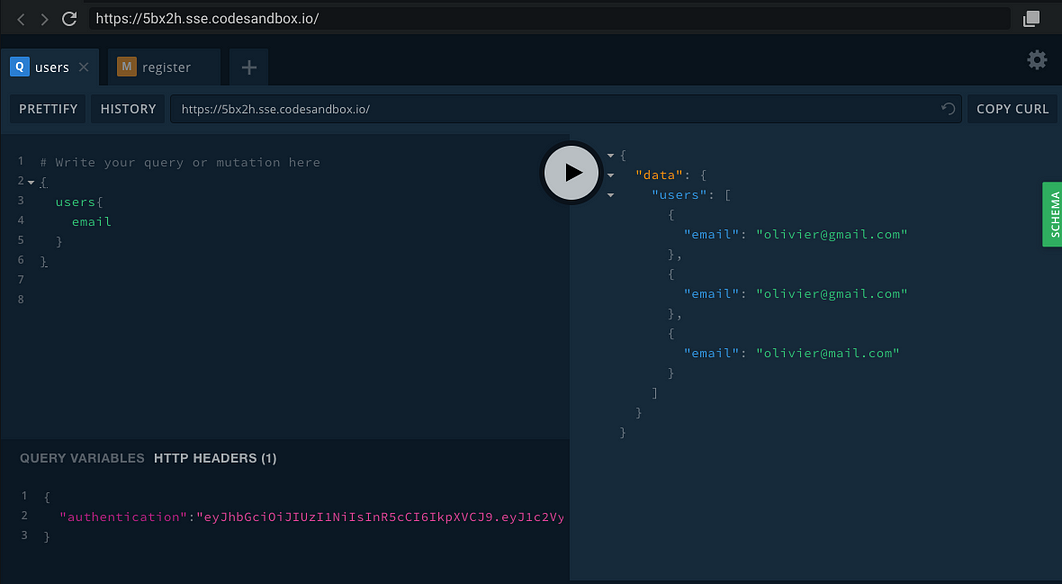
To use the demo, you need to set up the header as authentication, you can also connect to this server from any GraphQL client. Here are different queries you can run in the codesandbox above and their responses.

register mutation, returns a hashed password
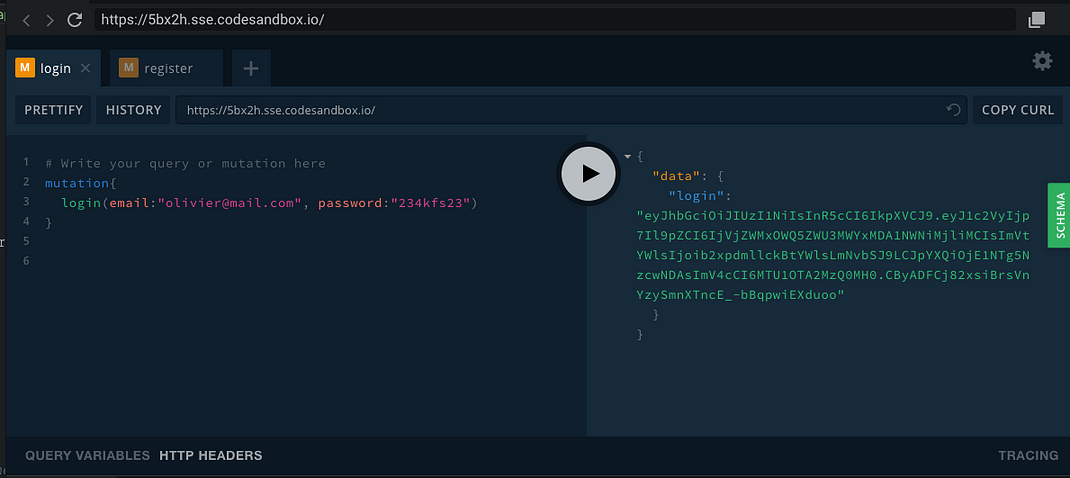
login mutation returns a token
If you try to query for users, you will get an authentication error which can be customized, this is because the authentication header contains an empty string instead of the actual token we received above from login.

returns error since we didn't provide the token in the header
Below here we provide the header with the correct token and you can see that we get our users emails as request in the query.
The article is longer than intended, I just wanted to make sure I cover most of what is needed to secure queries and mutations in GraphQL and I hope this has helped.
Conclusion
GraphQL is not a new tool, it has already been tested and tried and big companies are using it and more are migrating to it, It might be a good time to give it a try. The source can be found here on Github OlivierJM/graphql-auth-demo
Thank you for taking the time to read.
Published on: Tue Apr 02 2019 by Olivier JM